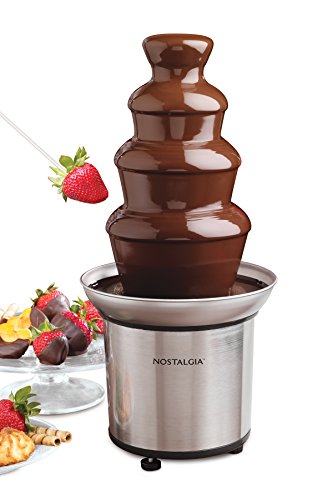


If you’re a chocolate lover, then the Nostalgia Chocolate Fountain is the perfect addition to your next gathering. This delightful appliance allows you to create a decadent flow of melted chocolate that everyone can enjoy. Whether you’re hosting a party or just want to indulge in a sweet treat, the Nostalgia Chocolate Fountain is easy to use and will bring a touch of nostalgia to any event.
The first step in using the Nostalgia Chocolate Fountain is to assemble the parts. Start by placing the base on a flat, stable surface. Then, carefully stack the tiers on top of the base, making sure they fit securely. Once the fountain is assembled, plug it into a power source and turn it on. The motor will begin to rotate, creating a mesmerizing display of cascading chocolate.
Next, it’s time to prepare the chocolate for the fountain. You can use any type of chocolate you like, but it’s best to use a high-quality chocolate that is specifically made for melting. Chop the chocolate into small pieces and place it in a microwave-safe bowl. Microwave the chocolate in short intervals, stirring between each interval, until it is completely melted and smooth.
Once the chocolate is melted, pour it into the base of the fountain. The chocolate will flow from the top tier and cascade down the tiers, creating a beautiful waterfall effect. To keep the chocolate flowing smoothly, it’s important to monitor the temperature of the chocolate. If it begins to cool and harden, gently stir the chocolate with a spoon to maintain its fluidity.
Now that your Nostalgia Chocolate Fountain is assembled and the chocolate is flowing, it’s time to enjoy! Provide a variety of dipping options, such as strawberries, marshmallows, or pretzels, for your guests to dip into the chocolate. The Nostalgia Chocolate Fountain will keep the chocolate warm and flowing, allowing everyone to indulge in a delicious and nostalgic treat. So go ahead, bring out your inner chocolatier and delight your guests with the Nostalgia Chocolate Fountain!
What Is a Nostalgia Chocolate Fountain?
A Nostalgia Chocolate Fountain is a popular kitchen appliance that is designed to create a fun and delicious experience for everyone. It is a specially designed fountain that uses heat to melt chocolate and keep it in a liquid state, allowing the chocolate to flow smoothly down the tiers of the fountain.
Unlike traditional chocolate fountains, which require constant supervision and maintenance, the Nostalgia Chocolate Fountain is designed to be easy to use and clean. It features a built-in heating element that ensures the chocolate stays melted and ready to use at all times.
How Does It Work?
The Nostalgia Chocolate Fountain works by heating the chocolate in the basin at the base of the fountain. Once the chocolate is melted, it is pumped to the top of the fountain and cascades down through the tiers. The chocolate is kept warm and flowing through a motorized auger, which prevents it from hardening and clogging the fountain.
Users can simply pour their desired chocolate into the basin, turn on the fountain, and watch as the rich, flowing chocolate creates an enticing centerpiece for any occasion. It is a great addition to parties, gatherings, or even as a unique dessert option for a family dinner.
What Can You Use it For?
The Nostalgia Chocolate Fountain can be used to create a wide variety of delicious treats. From fruits and marshmallows to cookies and pretzels, you can dip almost anything in the flowing chocolate for a tasty indulgence. It is also a great way to add a touch of elegance to desserts like cakes, ice cream sundaes, or even to drizzle on top of cupcakes.
Whether you are hosting a party or simply want to enjoy a sweet treat, the Nostalgia Chocolate Fountain is a versatile and easy-to-use appliance that brings a touch of nostalgia and fun to any occasion.
Benefits of Using a Nostalgia Chocolate Fountain
Using a Nostalgia Chocolate Fountain can bring a lot of enjoyment to any occasion. Here are some of the benefits of using this fantastic device:
1. Creates a Fun Atmosphere: A Nostalgia Chocolate Fountain adds excitement and fun to any event. Watching the smooth and silky chocolate cascading down the tiers is a thrilling sight for guests of all ages. It creates a visual spectacle that will leave everyone mesmerized.
2. Easy to Use: The Nostalgia Chocolate Fountain is designed to be user-friendly, making it easy for anyone to operate. It comes with straightforward instructions, making the setup process quick and hassle-free. All you need to do is melt the chocolate, pour it into the basin, and let the fountain do the rest.
3. Versatile: Whether you’re hosting a birthday party, a wedding reception, or a corporate event, the Nostalgia Chocolate Fountain can be a great addition to any occasion. It can be used with a variety of dipping items, such as strawberries, marshmallows, cookies, or even pretzels. The possibilities are endless.
4. Promotes Interaction: The Nostalgia Chocolate Fountain brings people together. It encourages guests to mingle and socialize as they gather around the fountain to dip their favorite treats. The shared experience of dipping food into the flowing chocolate creates a sense of camaraderie and adds a unique touch to any gathering.
5. Delicious and Decadent: The rich, velvety chocolate flowing from a Nostalgia Chocolate Fountain is an absolute delight for the taste buds. It provides a decadent treat that is sure to satisfy everyone’s sweet tooth. The high-quality stainless steel construction of the fountain ensures that the chocolate stays warm and melted for hours.
6. Easy to Clean: Cleaning up after using a Nostalgia Chocolate Fountain is a breeze. The detachable components can be easily washed with warm soapy water and dried for future use. With minimal effort, you can keep the fountain in pristine condition for long-lasting enjoyment.
7. Impressive Centerpiece: The Nostalgia Chocolate Fountain is not only functional but also serves as an eye-catching centerpiece for any event. Its elegant design and cascading chocolate add a touch of sophistication to any setting, making it a focal point that guests will remember.
Overall, a Nostalgia Chocolate Fountain is a versatile, user-friendly, and exciting addition to any event. It creates a fun and interactive atmosphere that will leave a lasting impression on your guests. So why wait? Get a Nostalgia Chocolate Fountain and elevate your next gathering to a whole new level of enjoyment.
Getting Started
Before using the Nostalgia Chocolate Fountain, it’s important to familiarize yourself with its parts and setup process. Follow these steps to get started:
Step 1: Unboxing
Open the package and carefully remove all components of the chocolate fountain. Check if all parts, such as the base, tower sections, auger, and tiers, are present and undamaged.
Note: If any parts are missing or damaged, contact the manufacturer for assistance.
Step 2: Assembly
Begin by attaching the base to a stable and level surface. Ensure that the power cord is easily accessible.
Next, stack the tower sections on top of the base, aligning the grooves and notches properly. Make sure each section is securely attached.
Note: Refer to the user manual for specific instructions on the assembly process.
Step 3: Preparing the Chocolate
Before adding the chocolate to the fountain, it needs to be melted. Chop the chocolate into small, uniform pieces for easier melting.
Place the chocolate in a microwave-safe bowl and heat it in short intervals, stirring after each interval, until fully melted and smooth. Alternatively, you can melt the chocolate using a double boiler.
Note: Avoid overheating the chocolate to prevent burning.
Step 4: Setting Up the Chocolate Fountain
Place the auger into the center tube of the fountain and make sure it is fitted securely.
Attach the tiers to the auger starting from the bottom up, making sure they are properly aligned and stable.
Pour the melted chocolate into the fountain’s bowl, being careful not to exceed the maximum fill line.
Note: Wipe any spills or excess chocolate from the outside of the fountain to prevent messes.
Now that you have set up the Nostalgia Chocolate Fountain, you are ready to start enjoying a delicious chocolatey treat. Refer to the user manual for detailed operation instructions.
Assembly and Set Up
Setting up your Nostalgia Chocolate Fountain is a breeze. Follow these simple steps to get it ready for use:
Step 1: Unbox and Inspect
After receiving your Nostalgia Chocolate Fountain, carefully unbox it and inspect all the components. Make sure that everything is present and undamaged.
Step 2: Wash and Dry
Before assembly, it is important to thoroughly wash and dry all parts of the chocolate fountain. This will ensure cleanliness and prevent any unwanted residue from affecting the performance of the fountain.
Step 3: Assembly
Start by placing the base of the chocolate fountain on a flat and stable surface. Connect the various tiers of the fountain, making sure they fit securely. Attach the auger to the center of the base, ensuring it is aligned properly.
Next, gently screw the top tier onto the auger, making sure it is stable and won’t wobble during use. Double-check all the connections before moving on to the next step.
Step 4: Preheating
Before using the chocolate fountain, it is recommended to preheat it. Plug the fountain into a power outlet and switch it on. Allow the chocolate to melt and flow through the fountain for about 10 minutes. This will ensure smooth and consistent chocolate flow during operation.
Once the preheating is complete, your Nostalgia Chocolate Fountain is ready to use. Simply pour melted chocolate into the basin, switch it on, and enjoy a cascade of delicious chocolatey goodness!
Remember to follow the manufacturer’s instructions and safety guidelines for the best experience with your Nostalgia Chocolate Fountain.
Preparing Your Chocolate
Before using your Nostalgia Chocolate Fountain, you need to prepare the chocolate properly to ensure a smooth and delicious flow. Follow these steps to prepare your chocolate:
- Start by choosing a high-quality chocolate. Dark chocolate, milk chocolate, or white chocolate are all great options. Make sure to use chocolate bars or chocolate chips specifically made for melting.
- Break the chocolate into small pieces to help it melt evenly. If you are using chocolate bars, chop them into small chunks. If you are using chocolate chips, no need to chop them.
- Place the chocolate pieces into a microwave-safe bowl or a heat-resistant container.
- Microwave the chocolate in short intervals, stirring in between, until it is completely melted and smooth. Be careful not to overheat the chocolate, as it will become stiff and difficult to work with.
- If you prefer to melt the chocolate using a double boiler, fill the bottom of a saucepan with a few inches of water and bring it to a simmer. Place a heat-resistant bowl on top of the saucepan, making sure it doesn’t touch the water. Add the chocolate to the bowl and stir until melted.
- Once the chocolate is melted, you can add any desired flavors or mix-ins, such as vanilla extract, peppermint extract, or crushed nuts. Stir well to incorporate the flavors.
- If the melted chocolate is too thick, you can add a small amount of vegetable oil or cocoa butter to thin it out. Add it gradually and stir well until you reach the desired consistency.
Now that your chocolate is prepared, you are ready to set up your Nostalgia Chocolate Fountain and start enjoying a delicious chocolatey treat!
Using the Nostalgia Chocolate Fountain
The Nostalgia Chocolate Fountain is a fun and delicious way to enjoy melted chocolate. Here are the steps to using it:
- Assemble the fountain: Start by making sure all the parts of the fountain are clean, dry, and properly assembled. Connect the tiers of the fountain according to the instructions provided.
- Prepare the chocolate: Choose high-quality chocolate and melt it in a separate microwave-safe container. Stir the chocolate occasionally to ensure it melts evenly. Alternatively, you can use chocolate melts or chocolate chips.
- Pour the melted chocolate: Once the chocolate is melted, pour it carefully into the base of the chocolate fountain. Be sure not to overfill it, as the chocolate will overflow as it begins to flow.
- Turn on the fountain: Plug in the fountain and switch it on. The chocolate will start to flow from the top tier and cascade down the tiers like a waterfall.
- Add dipping items: Place a variety of dipping items nearby, such as strawberries, marshmallows, pretzels, or cookies. Use skewers or fondue forks to dip the items into the flowing chocolate.
- Enjoy and maintain: Encourage guests to dip their favorite items into the chocolate, and enjoy the delicious treat. Remember to periodically check and stir the chocolate to prevent it from hardening.
- Cleaning up: Once you are finished, turn off the fountain and allow any remaining chocolate to cool and solidify. Carefully disassemble the fountain and clean the parts thoroughly using warm, soapy water. Dry all parts completely before storing.
Using the Nostalgia Chocolate Fountain is a delightful way to enhance any party or gathering. Guests of all ages will enjoy dipping their favorite treats into the velvety, melted chocolate.
Dipping Foods
The Nostalgia Chocolate Fountain provides a delightful way to enjoy a variety of dipping foods. Here are some delicious options to consider for your next chocolate fountain experience:
Fruits:
- Strawberries
- Pineapple chunks
- Banana slices
- Apple slices
- Grapes
Baked Goods:
- Marshmallows
- Pretzels
- Brownies
- Cookies
- Cake cubes
Other Options:
- Churros
- Graham crackers
- Rice Krispie treats
- Waffle pieces
- Donut holes
These are just a few ideas to get you started. Feel free to get creative and experiment with different dipping foods. The key is to ensure that the foods are bite-sized and able to be easily skewered or dipped into the flowing chocolate. Enjoy!
Q&A
How do I use the Nostalgia Chocolate Fountain for the first time?
To use the Nostalgia Chocolate Fountain for the first time, you will need to assemble the fountain according to the instructions in the user manual. Once assembled, plug in the fountain and allow it to preheat for about 5 minutes. Once preheated, pour melted chocolate into the basin of the fountain and turn it on. The chocolate will flow up the center cylinder and cascade down the tiers. You can then dip various foods into the flowing chocolate.
What type of chocolate should I use in the Nostalgia Chocolate Fountain?
You can use any type of chocolate that is suitable for melting. It is recommended to use high-quality chocolate for the best results. Some popular choices are milk chocolate, dark chocolate, and white chocolate. You can also experiment with different flavors such as mint or caramel. Just make sure to melt the chocolate before pouring it into the fountain.
How do I clean the Nostalgia Chocolate Fountain?
Cleaning the Nostalgia Chocolate Fountain is relatively easy. First, unplug the fountain and allow the chocolate to harden. Once the chocolate has hardened, carefully remove each tier and clean them with warm soapy water. Rinse the tiers thoroughly and dry them completely before reassembling the fountain. The basin can be wiped clean with a damp cloth. It is important to never immerse the motor or electrical components in water.
Can I use other dipping items besides fruit with the Nostalgia Chocolate Fountain?
Absolutely! While fruit is a popular choice for dipping in the Nostalgia Chocolate Fountain, you can also use a variety of other foods. Some ideas include marshmallows, pretzels, cookies, cake cubes, and even bacon. The key is to choose foods that are sturdy enough to hold up to the flow of chocolate and can be easily skewered with a fondue fork or toothpick.


