
Do you love freshly baked bread but don’t have an oven at home?
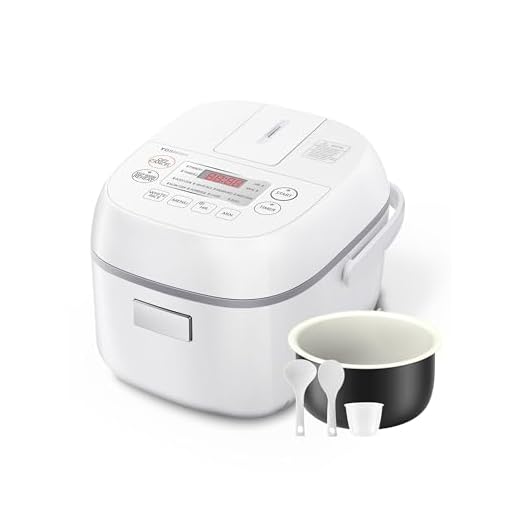
No worries! With a Toshiba rice cooker, you can easily make bread right in your own kitchen. This versatile appliance is not just for cooking rice, but it can also be used to bake delicious bread.
So how do you make bread using a Toshiba rice cooker?
Here’s a step-by-step guide to help you get started:
1. Gather your ingredients: You will need flour, yeast, sugar, salt, water, and any additional ingredients you want to add to your bread, such as herbs or nuts.
2. Prepare the rice cooker: Grease the inner pot of the rice cooker with oil or cooking spray to prevent the bread from sticking. Make sure the pot is clean and dry before adding the ingredients.
3. Mix the dough: In a large bowl, combine the flour, yeast, sugar, salt, and any additional ingredients. Gradually add water and knead until a soft dough forms. Adjust the amount of water as needed.
4. Let the dough rise: Cover the bowl with a clean cloth and let the dough rise for about an hour, or until it doubles in size. This may vary depending on the temperature and humidity of your kitchen.
5. Shape the dough: Once the dough has risen, gently punch it down to release any air bubbles. Shape the dough into a loaf or any desired shape that will fit into your rice cooker.
6. Place the dough in the rice cooker: Carefully transfer the shaped dough into the greased inner pot of the rice cooker. Close the lid.
7. Bake the bread: Set the rice cooker to the “Bake” or “Cake” mode, if available. If not, you can use the regular cooking mode. Cook the bread for about an hour or until it is golden brown and sounds hollow when tapped.
8. Cool and enjoy: Once the bread is cooked, carefully remove it from the rice cooker and let it cool on a wire rack. Slice and enjoy your homemade bread!
With a Toshiba rice cooker, making bread at home has never been easier. Experiment with different flavors and shapes to create your own unique bread recipes. Happy baking!
Preparing the Ingredients
Before you start making bread using your Toshiba rice cooker, you need to gather all the necessary ingredients. Here is a list of what you will need:
Ingredients:
| 2 cups of bread flour |
| 1 teaspoon of salt |
| 2 tablespoons of sugar |
| 1 tablespoon of dry yeast |
| 1 tablespoon of unsalted butter, softened |
| 1 cup of warm water (around 110°F/43°C) |
Make sure you have all the ingredients measured and prepared before you start mixing them together.
Next, you will need to activate the yeast. In a small bowl, combine the warm water and sugar. Sprinkle the dry yeast over the water and let it sit for about 5 minutes. The yeast should become foamy, which indicates that it is activated and ready to use.
While the yeast is activating, you can soften the butter by leaving it at room temperature for a while or microwaving it for a few seconds. Make sure the butter is not melted, just softened.
Once the yeast is foamy and the butter is softened, you are ready to move on to the next step of the bread-making process.
Setting Up the Toshiba Rice Cooker
Before you can start making bread using the Toshiba Rice Cooker, you’ll need to properly set it up. Follow these steps to get your rice cooker ready:
- Place the Toshiba Rice Cooker on a stable and heat-resistant surface.
- Ensure that the inner pot is clean and dry before using it.
- Attach the power cord securely to the rice cooker.
- Plug the power cord into a properly grounded electrical outlet.
- Open the lid of the rice cooker and insert the inner pot.
- Close the lid of the rice cooker securely.
Once you have set up the rice cooker, you’ll be ready to start making bread with it.
Mixing the Dough
Once you have gathered all the necessary ingredients for baking bread in your Toshiba Rice Cooker, it’s time to mix the dough. Mixing the dough is a crucial step in the bread-making process as it ensures that all the ingredients are well combined and evenly distributed.
Here’s how you can mix the dough using your Toshiba Rice Cooker:
- Measure the ingredients: Start by measuring the required amounts of flour, yeast, salt, sugar, and any other dry ingredients specified in the bread recipe you are following. Place them in a mixing bowl.
- Make a well: Create a well in the centre of the dry ingredients. This will be used to pour in the wet ingredients.
- Mix the wet ingredients: In a separate bowl, combine the wet ingredients such as water, milk, and oil. You can also add other flavorings like herbs or spices if desired. Mix them well using a whisk or fork.
- Pour the wet ingredients: Slowly pour the wet ingredients into the well in the dry ingredients. Use a spoon or spatula to gradually incorporate the dry and wet ingredients together.
- Knead the dough: Once the mixture starts to come together, it’s time to knead the dough. Dust a clean surface with flour and transfer the mixture onto it. Knead the dough by folding it onto itself and pushing it away with the heel of your hand. Repeat this process for about 10 minutes or until the dough becomes smooth and elastic.
- Shape the dough: Once the dough is properly kneaded, shape it into a ball or any desired shape according to your bread recipe.
Now that you have successfully mixed the dough, it’s time to let it rise and bake it in your Toshiba Rice Cooker. Follow the remaining steps in the bread-making process as per your recipe for a delicious homemade bread.
Baking the Bread
Once you have prepared the bread dough and placed it in the Toshiba rice cooker, it’s time to start the baking process. Follow these steps to ensure a successful bread baking experience:
Step 1: Select the Baking Mode
Turn on the rice cooker and choose the baking mode. Most Toshiba rice cookers have a specific mode for baking bread. Consult your user manual for the exact steps to select this mode.
Step 2: Set the Timer
After selecting the baking mode, set the timer based on the recipe you are using. Different recipes may require different baking times, so make sure to adjust the timer accordingly. Typically, bread takes around 2 to 3 hours to bake in a rice cooker.
Step 3: Monitor the Progress
During the baking process, it is important to monitor the progress of the bread. Check on it occasionally to ensure that it is rising and browning evenly. You can also use a toothpick or skewer to test if the bread is fully cooked. Insert it into the center of the bread, and if it comes out clean, the bread is ready.
Step 4: Remove the Bread
Once the bread is fully baked, carefully remove it from the rice cooker using oven mitts or tongs. Place it on a wire cooling rack to cool down. Do not slice the bread immediately as it needs some time to cool and set.
Step 5: Enjoy!
Once the bread has cooled down, it is ready to be enjoyed. Slice it as desired and serve it with your favorite spreads or use it for sandwiches. Freshly baked bread from a Toshiba rice cooker is a delightful treat!
Enjoying Freshly Baked Bread
There’s nothing quite like the aroma and taste of fresh, homemade bread. When you make bread using your Toshiba rice cooker, you can enjoy the satisfaction of baking your own delicious loaf right at home.
1. Serving Suggestions
Once your bread is baked, there are numerous ways to enjoy it. Here are some serving suggestions to inspire you:
| 1. | Enjoy a warm slice on its own, allowing the flavors to shine through. |
| 2. | Make a sandwich with your favorite fillings. The fresh bread will enhance any combination of ingredients. |
| 3. | Toast a slice and spread it with butter, jam, or cheese for a tasty snack. |
| 4. | Create bruschetta by topping slices with diced tomatoes, garlic, and olive oil. |
| 5. | Use the bread as a base for a homemade pizza. Add your favorite toppings and bake until golden and crispy. |
2. Storing Your Bread
To keep your freshly baked bread tasting its best, it’s important to store it properly. Here are some tips:
- Allow the bread to cool completely before storing it.
- Wrap the bread tightly in plastic wrap or place it in a resealable plastic bag to protect it from drying out.
- Store the bread at room temperature for up to two days. If you want to keep it longer, slice it and freeze the individual slices.
- When you’re ready to enjoy a slice, simply toast it or let it thaw at room temperature.
Following these tips will help ensure that your homemade bread stays fresh and delicious for as long as possible.
So go ahead, experiment with flavors and ingredients, and enjoy the satisfaction of creating your own delicious homemade bread using your Toshiba rice cooker. With the right techniques and a little creativity, the possibilities are endless!
FAQ
What is a Toshiba rice cooker?
A Toshiba rice cooker is a kitchen appliance designed to cook rice automatically without any additional monitoring or adjustment.
Can a Toshiba rice cooker be used to make bread?
Yes, a Toshiba rice cooker can be used to make bread with the appropriate settings and ingredients.
What ingredients are needed to make bread using a Toshiba rice cooker?
The ingredients needed to make bread using a Toshiba rice cooker include flour, yeast, sugar, salt, water, and any additional ingredients for flavor, such as butter or herbs.
How long does it take to make bread using a Toshiba rice cooker?
The time it takes to make bread using a Toshiba rice cooker can vary depending on the specific model and settings used. On average, it can take anywhere from 1 to 3 hours.


