Are you tired of the same old plain tumbler and want to add a unique touch to it? Epoxy resin can give your tumbler a beautiful and durable finish that will make it stand out from the crowd. However, applying epoxy can be a messy and time-consuming process. That’s where a rotisserie can come in handy!
Epoxy resin requires a level surface to cure properly. Using a rotisserie can ensure that your tumbler rotates evenly, allowing the epoxy to spread evenly and dry smoothly. This method also helps to prevent drips and uneven epoxy layers, resulting in a flawless finish.
To begin, gather all the necessary materials: a tumbler, epoxy resin, a rotisserie machine, epoxy mixing cups, stirring sticks, and any embellishments you want to add to your tumbler. Make sure to choose epoxy resin that is specifically designed for tumblers, as it will provide the best adhesion and durability.

First, prepare your tumbler by cleaning it thoroughly with soap and water to remove any dust or oils. Then, it’s time to mix your epoxy resin according to the manufacturer’s instructions. Mix the resin and hardener in a disposable cup, stirring gently but thoroughly until the mixture is clear and free of any streaks.
What is Epoxy and Why Use It?
Epoxy is a type of adhesive that is becoming increasingly popular in the crafting and DIY community. It is a versatile material that is used for bonding, sealing, and coating various surfaces. Epoxy consists of two components: resin and hardener. When combined, these two components create a strong and durable bond.
There are several reasons why epoxy is commonly used in crafts and projects such as epoxy tumblers. Firstly, epoxy provides a glossy and smooth finish that enhances the appearance of the object. This makes it ideal for creating unique and eye-catching designs on tumblers.
In addition to its aesthetic appeal, epoxy also offers excellent durability. Once dried and cured, epoxy forms a hard and protective surface that is resistant to scratches, UV rays, and water. This makes it suitable for everyday use and ensures that your tumbler will last for a long time.
Furthermore, epoxy is easy to work with and can be applied to various materials such as stainless steel, glass, and plastic. It can also be tinted or mixed with pigments to achieve different colors and effects. This allows you to unleash your creativity and personalize your tumbler according to your preferences.
Overall, epoxy is a versatile and reliable adhesive that is perfect for creating stunning and durable epoxy tumblers. Whether you are a beginner or an experienced crafter, epoxy is a great option for adding that extra touch of beauty and protection to your tumbler.
Discover the Benefits of Epoxy Resin for Tumbler Coating
Epoxy resin is a popular choice for coating tumblers due to its numerous benefits. Whether you’re a seasoned crafter or just starting out, using epoxy resin can elevate your tumbler-making process and result in stunning and durable designs. Here are some of the key benefits of using epoxy resin for tumbler coating:
1. Superior Protection
Epoxy resin creates a protective layer over the tumbler surface, guarding it against scratches, scuffs, and everyday wear and tear. This added protection allows your tumbler to maintain its beauty and quality for a longer period.
2. High Gloss Finish
When properly applied, epoxy resin offers a high-gloss, glass-like finish that enhances the overall aesthetics of your tumbler. This shiny and smooth surface not only makes the design pop but also gives a professional look and feel to your finished product.
3. Versatility in Design
With epoxy resin, you have the freedom to create intricate designs and patterns on your tumbler surface. Whether you want to embed glitter, add decals, or experiment with different colour combinations, epoxy resin allows you to unleash your creativity and achieve a truly unique and personalised tumbler.
4. Excellent Adhesion
Epoxy resin forms a strong bond with various materials, ensuring excellent adhesion to your tumbler surface. This helps prevent peeling, chipping, or fading over time, making your epoxy-coated tumbler long-lasting and durable.
5. Easy to Use
Using epoxy resin for tumbler coating doesn’t have to be complicated. With the right tools and proper technique, you can achieve professional-looking results even if you’re a beginner. Epoxy resins are generally self-leveling, making it easier to achieve an even and smooth finish. Plus, there are plenty of online tutorials and resources available to guide you through the process.
In conclusion, epoxy resin offers a range of benefits for coating tumblers. From providing superior protection and a high-gloss finish to allowing creative freedom and easy application, epoxy resin is the go-to choice for a stunning and long-lasting tumbler design.
Choosing the Right Tumbler and Rotisserie Set up
When it comes to epoxying a tumbler with a rotisserie, it’s important to choose the right tumbler and rotisserie set up to ensure the best results. Here are a few factors to consider:
- Tumbler size: The size of the tumbler you choose will depend on your personal preference and the size of the objects you want to epoxy. A larger tumbler will allow you to work with bigger items, while a smaller one may be more suitable for smaller projects.
- Tumbler material: Tumblers can be made from various materials, such as stainless steel, plastic, or glass. Each material has its pros and cons, so think about the durability, heat resistance, and transparency you desire for your epoxy projects.
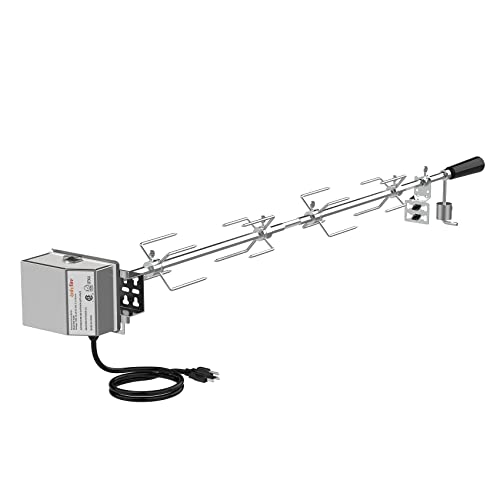
- Rotisserie type: There are different types of rotisserie setups available, including manual, motorized, or DIY options. Consider your budget, convenience, and the level of control you want over the rotation speed when selecting a rotisserie.
- Rotation speed: The rotation speed is crucial for achieving an even epoxy coating on your tumbler. Look for a rotisserie that allows you to adjust the speed or choose one with a consistent rotation speed that suits your epoxy application needs.
- Stability: Ensure that the tumbler and rotisserie set up provides stability during the epoxying process. A stable setup will help prevent spills and ensure an even epoxy application.
By considering these factors and choosing the right tumbler and rotisserie set up, you’ll be well-equipped to epoxy your tumbler with ease and achieve professional-looking results.
Find the Perfect Tumbler and Rotisserie for Epoxy Coating
When it comes to epoxy coating a tumbler, having the right tools is key to achieving a flawless and professional-looking finish. Two essential items you will need are a tumbler and a rotisserie.
Finding the Perfect Tumbler
When choosing a tumbler for epoxy coating, it’s important to consider the size and material. The size of the tumbler depends on your preference and the amount of epoxy you plan to use. If you want to create a larger tumbler with elaborate designs, you may opt for a larger size. On the other hand, if you prefer smaller tumblers, a compact size will be more suitable.
Additionally, the material of the tumbler is crucial, as it affects the durability and appearance of the final product. Stainless steel tumblers are a popular choice due to their durability, heat resistance, and sleek appearance. However, you can also choose tumblers made of other materials such as plastic or glass, depending on your personal preference.
Selecting the Right Rotisserie
A rotisserie is an essential tool for epoxy coating a tumbler, as it allows for even and consistent rotation during the drying and curing process. When selecting a rotisserie, there are a few key factors to consider.
Firstly, ensure that the rotisserie is compatible with the size of your tumbler. You want to make sure that your tumbler fits securely and does not wobble during the rotation. Additionally, look for a rotisserie with adjustable speed settings, as this will give you more control over the drying and curing process.
Furthermore, consider the construction and quality of the rotisserie. Look for a sturdy and well-built rotisserie that can handle the weight and size of your tumbler without any issues. It’s also beneficial to choose a rotisserie that is easy to clean, as epoxy can be difficult to remove if it drips onto the rotisserie.
By finding the perfect tumbler and rotisserie for epoxy coating, you set yourself up for success. Remember to consider the size, material, and compatibility of the tools to achieve the best results for your epoxy-coated tumblers.
Preparing Your Tumbler for Epoxy Coating
Before you begin the process of epoxy coating your tumbler, it is crucial to properly prepare and clean the surface to ensure the best adhesion and finish. Here are the steps to follow:
1. Clean the Tumbler
Start by thoroughly cleaning the tumbler with warm, soapy water and a sponge or soft cloth. Remove any dirt, debris, or oils from the surface. Rinse the tumbler with clean water and allow it to dry completely.
2. Sand the Surface
Use sandpaper or a sanding block to gently sand the surface of the tumbler. This step helps to create a rough texture, allowing the epoxy to adhere better. Be sure to sand evenly and avoid applying too much pressure, as this can damage the tumbler.
After sanding, wipe away any dust or residue with a damp cloth or tack cloth.
3. Mask Any Areas Not to be Coated
If there are any areas of the tumbler that you don’t want to be epoxy coated, such as the rim or the bottom, use masking tape or painter’s tape to cover and protect those areas. This will ensure clean lines and a professional-looking finish.
Make sure the tape is applied securely, with no gaps or loose edges that could allow epoxy to seep through.

Once these preparation steps are complete, your tumbler is ready for the epoxy coating process. Follow the instructions for mixing and applying epoxy to achieve a beautiful, durable finish on your tumbler.
A Step-by-Step Guide to Cleaning and Sanding Your Tumbler
Before you begin the epoxy process on your tumbler, it’s important to thoroughly clean and sand the surface to ensure proper adhesion. This will help create a smooth and polished finish on your tumbler.
Here are the step-by-step instructions on how to clean and sand your tumbler:
| Step | Description |
|---|---|
| 1 | Start by removing any stickers or labels from the tumbler. Use warm soapy water and a cloth to gently scrub off any residue. |
| 2 | Once the stickers are removed, rinse the tumbler with clean water to remove any soap residue. Dry it thoroughly with a clean towel. |
| 3 | Next, use a fine-grit sandpaper (around 220-320 grit) to lightly sand the entire surface of the tumbler. This will help roughen up the surface and remove any existing coatings or rough spots. |
| 4 | After sanding, wipe down the tumbler with a clean cloth to remove any dust or debris. Make sure the surface is completely clean and dry before proceeding. |
| 5 | If there are any dents or imperfections on the tumbler, you can use a filler putty to smooth them out. Follow the manufacturer’s instructions for the specific product you’re using. |
| 6 | After applying the filler putty, let it dry completely. Once dry, use sandpaper to smooth out the repaired areas and blend them with the rest of the tumbler’s surface. |
| 7 | Finally, wipe down the tumbler one last time to remove any dust or debris. Your tumbler is now ready for the epoxy application process! |
Following these steps will ensure that your tumbler is properly prepared for the epoxy application. Taking the time to clean and sand your tumbler will result in a professional-looking finished product.
Epoxy Mixing and Application Techniques
Properly mixing and applying epoxy is crucial when working on a tumbler project with a rotisserie. Follow these steps to ensure successful epoxy application:
1. Prepare Your Work Station
Before you start mixing your epoxy, make sure you have a clean work area with proper ventilation. Lay down a protective covering, such as a plastic sheet or craft paper, to prevent any spills or drips from damaging your work surface.
2. Gather Your Supplies
Collect all the necessary supplies, including the epoxy resin and hardener, mixing cups, stirring sticks, and any additional additives or pigments you plan to use in your design. It’s important to use a high-quality epoxy that is designed for use on tumblers to ensure a durable and long-lasting finish.
3. Measure the Epoxy
Follow the manufacturer’s instructions to determine the proper ratio of resin to hardener for your specific epoxy. Use measuring cups or syringes to accurately measure the required amounts. It’s crucial to measure with precision to achieve the desired properties and avoid any curing issues.
4. Mix Thoroughly
Pour the measured amounts of epoxy resin and hardener into a mixing cup. Use a stir stick to thoroughly mix the two components together. It’s important to mix slowly and consistently, ensuring that no streaks or unmixed portions remain. Scrape the sides and bottom of the cup as you mix to ensure all the resin and hardener are fully combined.
5. Add Pigments or Additives (Optional)
If you want to add color or special effects to your tumbler, now is the time to add pigments or additives to the epoxy mixture. Mix these in thoroughly, taking care to achieve the desired color or effect. Remember that less is often more when it comes to adding pigments or additives, as too much can affect the epoxy’s curing process.
6. Check for Bubbles
After mixing, let the epoxy sit for a few minutes, allowing any air bubbles to rise to the surface. Gently blow on the mixture or use a heat gun or torch to eliminate the bubbles. Be careful not to apply too much heat, as this can cause the epoxy to cure too quickly or become discolored.
7. Apply the Epoxy
Now that your epoxy is mixed and any bubbles have been removed, it’s time to apply it to the tumbler. Use a paintbrush or foam brush to evenly coat the entire surface of the tumbler. Apply a thin, even layer, rotating the tumbler slowly on the rotisserie to ensure complete coverage. Take care to avoid drips or excess pooling of epoxy, as this can result in an uneven finish.
8. Allow Curing Time
Once the epoxy is applied, allow the tumbler to cure according to the manufacturer’s instructions. This usually involves letting it sit undisturbed for several hours or overnight. Make sure the tumbler is placed in a clean, dust-free area to prevent any debris from settling onto the wet epoxy.
Following these techniques will help you achieve a beautiful and durable epoxy finish on your tumbler. Remember to always read and follow the manufacturer’s instructions for your specific epoxy product, as application methods and curing times may vary.

FAQ
What materials do I need to epoxy a tumbler with a rotisserie?
You will need a tumbler, epoxy resin and hardener, a rotisserie, a foam brush or sponge, gloves, and a mixing cup.
Can I epoxy a tumbler without a rotisserie?
Yes, you can still epoxy a tumbler without a rotisserie. It just helps to have a rotisserie to keep the tumbler rotating while the epoxy dries for an even coating.
How long does it take for the epoxy to dry on a tumbler?
The drying time can vary depending on the specific epoxy resin used, but generally, it takes around 24-72 hours for the epoxy to fully cure and dry on a tumbler.