

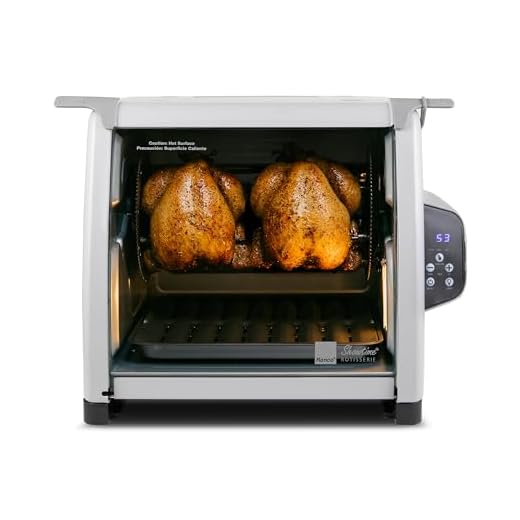
If you want to impress your friends and family with a delicious meal, then putting two chickens on a rotisserie is a fantastic idea. Not only will this method infuse the meat with incredible flavors, but it will also create a beautiful presentation that will make everyone’s mouth water.
Step 1: Preparing the Chickens
Before you start, make sure to properly clean and pat dry both chickens. This will ensure that the spices and seasonings can adhere to the skin for maximum flavor. Additionally, trussing the chickens will help them cook more evenly and hold their shape on the rotisserie.
Pro tip: Season the chickens with your favorite rub or marinade at least two hours before cooking to allow the flavors to penetrate the meat.
Step 2: Setting Up the Rotisserie
Next, you’ll need to set up your rotisserie according to the manufacturer’s instructions. This usually involves attaching the rotisserie forks securely to the chickens and making sure they are balanced and centered.
Pro tip: If your rotisserie has a motor, remember to check the battery or power source to ensure it won’t run out during cooking.
Step 3: Cooking the Chickens
Once your chickens are secured on the rotisserie, it’s time to start cooking. Preheat your grill or oven to the desired temperature (usually around 350°F or 175°C) and place the chickens on the rotisserie rack. Cook the chickens until the internal temperature reaches 165°F (75°C) for perfectly juicy and tender meat.
Pro tip: Baste the chickens with your favorite sauce or marinade every 30 minutes to keep them moist and add extra flavor.
By following these simple steps, you’ll be able to put two chickens on a rotisserie like a pro. The result will be a mouthwatering meal that is sure to impress everyone around the table. So, get ready to enjoy succulent, flavorful chicken that will have your guests asking for seconds!
Preparing the Chickens
Before putting the chickens on the rotisserie, it is important to properly prepare them to ensure a delicious and evenly cooked meal. Follow these steps:
- Thoroughly clean the chickens under cold running water. Remove any giblets and excess fat from the cavities.
- Pat the chickens dry with paper towels to remove excess moisture.
- Season the chickens with your favorite rub or marinade. Make sure to season both the inside and outside of the chickens.
- Let the seasoned chickens sit at room temperature for about 20-30 minutes to allow the flavors to infuse.
- Truss the chickens by tying the legs together with kitchen twine. This will help them cook more evenly.
- If desired, stuff the cavity of the chickens with aromatics like lemon slices, garlic cloves, or fresh herbs. This will impart additional flavors to the meat.
- Secure the wings of the chickens to their bodies using toothpicks or butcher’s twine. This will prevent them from burning during cooking.
- Optional: Brush the chickens with some olive oil or melted butter to help promote a crispy and golden skin.
Once the chickens are properly prepared, they are ready to be placed on the rotisserie and cooked to perfection.
Choosing the Right Chickens
When it comes to putting two chickens on a rotisserie, it’s important to choose the right kind of chickens. The quality and size of the chickens will greatly affect the outcome of your rotisserie chicken.
First and foremost, it’s important to choose chickens that are fresh and of high quality. Look for chickens that have a healthy appearance, with plump breasts and smooth skin. Avoid chickens that have any discoloration, strong odors, or signs of bruising.
In addition to freshness, the size of the chickens also matters. It’s best to choose chickens that are of similar size, as this will ensure even cooking. If the chickens are not of similar size, the larger chicken may end up overcooked while the smaller one may be undercooked.
Another factor to consider is the type of chicken. There are different breeds of chickens, each with its own characteristics. Some breeds are known for their tenderness, while others are known for their flavor. Research different breeds and choose the ones that best align with your preferences.
Finally, consider whether you want to use organic or conventional chickens. Organic chickens are raised without the use of antibiotics or hormones, making them a healthier choice. Conventional chickens, on the other hand, are more affordable but may not be as high in quality as organic chickens.
Overall, selecting the right chickens is key to achieving a delicious and satisfying rotisserie chicken. Take your time to choose chickens that are fresh, similar in size, and of a breed that suits your taste preferences. Whether you opt for organic or conventional chickens, make sure they are of the highest quality. This attention to detail will ensure a mouthwatering rotisserie chicken experience that you and your guests will truly enjoy.
Cleaning and Seasoning the Chickens
Before putting your chickens on the rotisserie, it’s important to clean them thoroughly. Start by removing any giblets or organs inside the cavity and discarding them. Rinse the chickens under cold water to remove any excess blood or debris.
Next, pat the chickens dry with paper towels. This will help ensure a crispy skin when they cook. You can also use a kitchen towel or a clean cloth if you prefer.
Once the chickens are clean and dry, it’s time to season them. Generously sprinkle salt and pepper on both the outside and inside of the chickens. You can also add any other desired seasonings, such as garlic powder, paprika, or herbs like rosemary or thyme.
For an extra burst of flavor, consider marinating the chickens overnight. Combine olive oil, lemon juice, minced garlic, and your favorite herbs and spices in a resealable plastic bag. Place the cleaned and seasoned chickens inside the bag, seal it, and refrigerate overnight.
Remember to let the chickens come to room temperature before putting them on the rotisserie. This will help them cook more evenly and prevent them from drying out.
By properly cleaning and seasoning the chickens, you can ensure a delicious and flavorful meal when they are ready to be cooked on the rotisserie.
Setting up the Rotisserie
Before you can start cooking your chickens on the rotisserie, it’s important to properly set up the equipment. Follow these steps to ensure a successful cooking process:
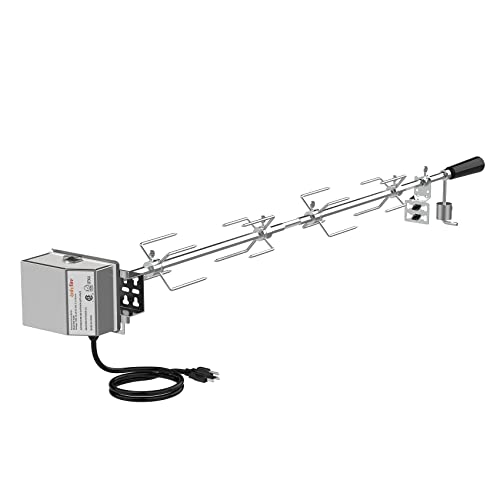
1. Assemble the Rotisserie
Begin by carefully unpacking the rotisserie kit and assembling all the necessary components. This usually includes the motorized spit rod, prongs or forks for holding the chickens, and any other accessories provided with your specific rotisserie model. Refer to the instruction manual for detailed assembly instructions.
2. Attach the Spit Rod
Once the rotisserie is assembled, attach the spit rod to the motor assembly. Secure it tightly to ensure it doesn’t come loose during the cooking process.
3. Adjust the Spit Length
Depending on the size of your chickens and the available space on the rotisserie, you may need to adjust the length of the spit rod. Ensure that there is enough space between the chickens and the heating elements to prevent any potential flaring or charring. Adjust the length accordingly and lock it in place.
4. Secure the Chickens
Before placing the chickens on the spit rod, ensure that they are properly trussed or tied up. This will help keep them secure and prevent them from spinning or shifting during the cooking process. Use butcher’s twine or kitchen string to truss the chickens, tying the legs and wings tightly against their bodies.
Once the chickens are trussed, slide the prongs or forks onto the spit rod, making sure they are centered and securely holding the chickens in place. Adjust the prongs as necessary to ensure a tight grip.
5. Preheat the Rotisserie
Before placing the chickens on the rotisserie, preheat the equipment according to the manufacturer’s instructions. This will help ensure even cooking and prevent any potential food safety issues.
6. Mount the Chickens on the Rotisserie
Once the rotisserie is preheated, carefully mount the spit rod onto the rotisserie, ensuring that it is securely fastened. Double-check that the chickens are properly balanced on the spit rod to prevent any imbalances or spinning issues during cooking.

Now that your rotisserie is set up and the chickens are securely mounted, you’re ready to start cooking them to perfection!
Assembling the Rotisserie
Before you begin assembling the rotisserie, make sure you have all the necessary components. Usually, a rotisserie kit will come with a spit rod, forks, handle, motor, and brackets.
Start by attaching the brackets to the grill. These brackets will hold the spit rod in place and ensure it rotates smoothly. Follow the instructions provided with your rotisserie kit to properly attach the brackets.
Next, insert the spit rod through the brackets. Make sure it is centered and secured tightly. If needed, use the provided screws or clamps to keep the spit rod in place.
Once the spit rod is in place, attach the forks to either end of the rod. These forks will hold the chickens securely as they rotate. Make sure the forks are tightened properly to prevent any accidents while cooking.
After attaching the forks, connect the motor to the spit rod. The motor will provide the necessary power for the rotation. Make sure the motor is securely fastened to the brackets or grill to ensure stability.
Finally, attach the handle to one end of the spit rod. This handle will allow you to easily turn the chickens as they cook. Make sure the handle is tight and provides a comfortable grip.
Once you have assembled the rotisserie, double-check all the connections and make sure everything is secure. You are now ready to start cooking your two chickens on the rotisserie!
Securing the Chickens on the Rotisserie
Before you start cooking your chickens on a rotisserie, it is important to ensure that they are securely placed on the spit rod. Follow these steps to safely secure the chickens:
1. Prepare the Chickens
Start by rinsing the chickens thoroughly under cold water and removing any giblets or excess fat from the cavities. Pat the chickens dry with paper towels.

2. Truss the Chickens
Trussing the chickens helps to maintain their shape and keep the wings and legs from flopping around during cooking. Use butcher’s twine to tie the legs together and tuck the wings behind the back.
3. Insert the Spit Rod
Slide the spit rod through one chicken, starting at the tail end and exiting through the neck cavity. Ensure that the chicken is centered on the rod. Repeat this step for the second chicken, placing it directly against the first chicken.
4. Secure the Chickens
Using the prongs provided with your rotisserie kit, secure the chickens onto the spit rod. Place one prong through the bottom of the chicken, near the tail, and another prong through the top, near the neck. Tighten the prongs to hold the chickens firmly in place.
Make sure the chickens are evenly balanced on the rod to prevent them from spinning unevenly during cooking. Adjust the position and tighten the prongs if needed.
With the chickens securely fastened to the rotisserie, you can now proceed with cooking them to perfection.
FAQ
What is a rotisserie?
A rotisserie is a cooking device that rotates food on a skewer or spit to ensure even cooking and browning.
Can I put two chickens on a rotisserie at the same time?
Yes, you can put two chickens on a rotisserie at the same time. Make sure the chickens are similar in size and securely fastened to the spit.